Password-protected pages on Netlify
In the performing arts — where I work — many sites of artists and companies have a so-called "pro" area, a password-protected part of the website reserved for sector professionals or press. It often contains program notes, high-resolution images, technical riders; anything the company might want to share with only some.
I recently implemented such a pro area for a static website hosted on Netlify. In this article, I'll run you through the setup I created for this. We'll leverage serverless functions, redirects and Netlify's excellent Identity service to hide certain parts of a static site behind a password.
The requirements
We want to hide some pages behind a password, but there’s no need for a full-blown user account. After all, the information we’re looking to protect is not user-specific; we simply don’t want to show it to just anyone. Our use case is very similar to a password-protected video on Vimeo, in that a visitor only needs a password, and not an account, to access a private resource.
Nevertheless, we’re not fencing a single resource, but an area. The visitor shouldn’t have to enter a password on every single page in the guarded portion of the site. Once they’re through the door, they can roam around freely. This is the tricky part, as static sites don’t have access to sessions to persist state.
Finally, I wanted this to work without any client-side JavaScript. That means we can’t fetch data to populate our protected pages dynamically, which could have been a viable strategy otherwise.
Coding along
I set up a starter repository for anyone who'd like to follow along while we code and configure this functionality. You can deploy the bare site to Netlify with the click of a button. Every time you commit and push changes to your copy of the repository, the site will be re-deployed.
Role-based access control
We're granting access to visitors depending on the role they have, on whether or not they're a "pro". Therefore, Netlify's role-based access control comes to mind as a suitable tool to guard pages. By assigning certain roles to certain users, we can redirect them to different areas of the site.
Netlify allows setting up redirect rules with a Role condition. You can add a _redirects file in the public directory, or use the alternative syntax for the netlify.toml configuration file in the root directory. Here, I'll show the latter. Add this to the TOML file:
[[redirects]]
  from = "/pro/*"
  status = 200
  force = true
  conditions = {Role = ["pro"]}

[[redirects]]
  from = "/pro/*"
  to = "/login/"
  status = 302
  force = true
Look at the bottom rule first. This tells Netlify to redirect any requests for pages in the /pro/ directory to the /login/ page. Unless the top rule kicks in, which lets visitors access the pro pages if they have the correct role set. Notice how we force the redirect. Without that parameter, Netlify would ignore any redirects from pages that actually exist. If all went well, you should no longer be able to reach the pro area.
Now, how do we set this Role property? By making use of JSON Web Tokens, JWT in short. You can think of JWT as encrypted credentials, which we'll store as a cookie on the front-end. With each page request, Netlify looks for a nf_jwt cookie. If present, the cookie with the JWT gets decoded and read. The resulting JSON object determines if Netlify attributes a role to a visitor, and therefore if a role-based redirect will occur.
We'll resort to Netlify Identity to generate the authentication tokens.
Configuring Netlify Identity
Netlify Identity is a service to manage and authenticate users on your site. Although we don't need user accounts with a username and a password, we can repurpose the service to build password-only logins. We'll create a single user. When a visitor tries to sign in, they'll provide the password while we fill in the username for them.
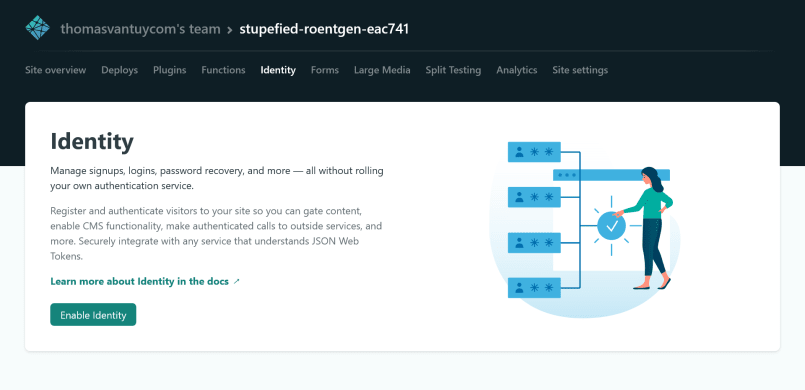
First, we need to enable the service in the site's dashboard under the Identity tab. The free tier allows up to 1,000 users, so we should be good.
Next, we'll create our one account. Click on "Settings and usage" and scroll down to "Confirmation template". Edit these settings by checking the "Allow users to sign up without verifying their email address" box. This allows for quicker user creation.

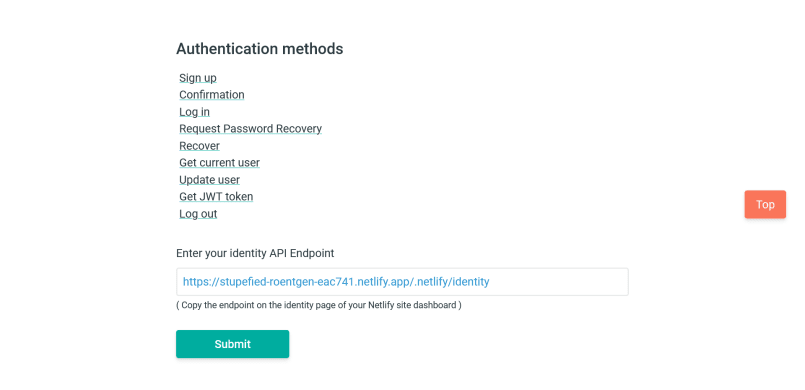
Now visit the GoTrue playground. GoTrue is the name of the API behind the Identity service. We'll use the playground to avoid implementing a sign-up route for this single account. In your dashboard, navigate back to the Identity tab and copy the API endpoint. This should be the name of your website, followed by /.netlify/identity. Paste the endpoint in the playground and click "Submit".
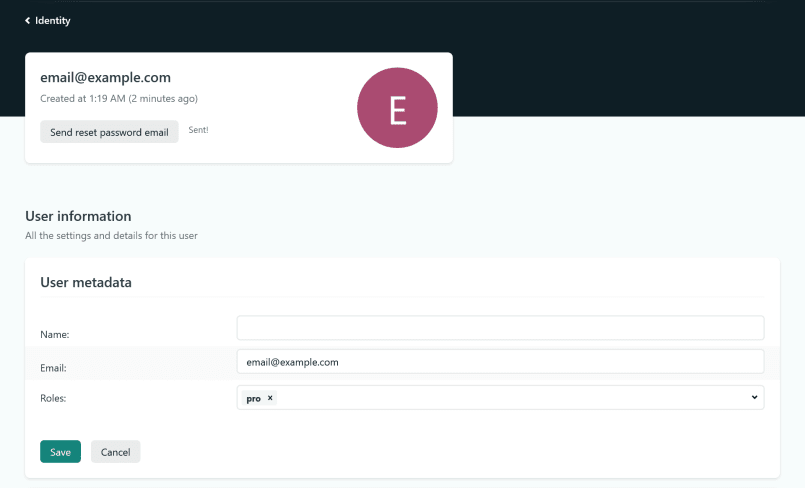
Underneath, create a user. The email doesn't really matter; the password is the password for your gated content. Back in the Identity tab, you should now see an account. Click to edit and assign the pro role.
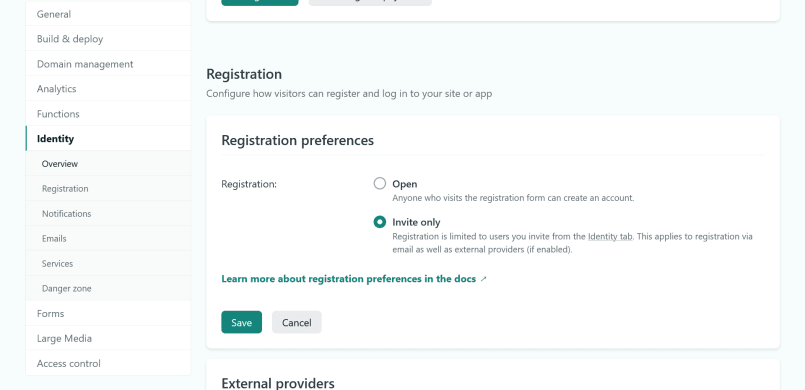
Finally, go back to "Settings and usage" and set "Registration preferences" to "Invite only". We want no more users after this.
Let's have a look at how we can put this user account to good use by creating a JWT token.
Getting a JWT token
We'll hit another GoTrue endpoint, /token, to create our access token. Because we're not using JavaScript on the front-end, and because we don't want to expose the username, we'll resort to a serverless function to negotiate the token creation for us.
Add a form to the login page:
<form action="/.netlify/functions/login" method="POST">
  <label for="password">Password</label>
  <input type="password" name="password" id="password" />
  <button type="submit">Get access</button>
</form>
When a visitor hits the submit button, a login function will receive the password. Let's create that function.
Add a functions folder to your project and create login.js within. Next, inform Netlify on where to find our function. Tack these lines on to your netlify.toml configuration:
[functions]
  directory = "functions"
We'll send a request in our function, so we'll install axios. In your project, run:
 npm init -y
 npm install axios
Open up the login function and add some functionality:
const querystring = require('querystring');
const axios = require('axios');

exports.handler = async function (event, context) {
  const { password } = querystring.parse(event.body);

  const endpoint = `${process.env.URL}/.netlify/identity/token`;
  const data = querystring.stringify({
    grant_type: 'password',
    username: 'email@example.com',
    password: password,
  });
  const options = {
    headers: {
      'Content-Type': 'application/x-www-form-urlencoded',
    },
  };

  try {
    const response = await axios.post(endpoint, data, options);
    const access_token = response.data.access_token;

    return {
      statusCode: 302,
      headers: {
        'Set-Cookie': `nf_jwt=${access_token}; Path=/; HttpOnly; Secure`,
        'Cache-Control': 'no-cache',
        Location: '/pro/',
      },
    };
  } catch (error) {
    console.log(error);
    return {
      statusCode: 302,
      headers: {
        'Cache-Control': 'no-cache',
        Location: '/login/',
      },
    };
  }
};
Let's go over this. First, we retrieve the password from the form. We then construct the endpoint URL and mold the authentication data to the shape the /token endpoint expects; something like grant_type=password&username=email@example.com&password=secret. Perform a request and retrieve the access token from the response. We then redirect the visitor to the /pro/ page while setting the nf_jwt cookie with our JWT token. The HttpOnly and Secure flags enhance security, as our cookie can't be intercepted on insecure connections, or tampered with on the client side.
If the password's wrong, the visitor goes back to the login page. Without an error message or some indication of what went wrong, this isn't the best user experience. But this is where JavaScript could jump in to enhance things. At least there's a working baseline when scripts are disabled.
The JWT token is valid for one hour and the cookie's set for the duration of the session. So our visitor can browse the pro area for whichever of these durations is the shortest. After that, they have to enter the password again. This is perfectly fine for my use case. If you want to renew the token so the visitor remains logged in, you'll have to store the refresh token as well, and perform additional requests to the GoTrue API.
Remembering the target page
Right now, the protected area consists of only one page. When the visitor tries to access the /pro/ route, they get redirected to the login page, which in turn redirects them back to /pro/. If we have a couple more pages nested in the /pro/ directory, the hard-coded redirect in our login function might no longer be so great. If a visitor bookmarks, say, /pro/nested/, they probably expect to go back there after the login. We should somehow remember the page they were trying to visit.
Query strings are a good tool for this. Instead of a redirect to /login/, the URL will now become /login/?return=path-to-the-target-page. My first intuition was to try this:
[[redirects]]
 from = "/pro/*"
 to = "/login/?return=/pro/:splat"
 status = 302
 force = true
The :splat corresponds to whatever gets matched by the * wildcard. For /pro/nested/, :splat would equal nested/. That works, but we should escape the forward slashes in the query string. Luckily, Netlify's functions can help us out again.
Create another function, redirect.js, with these contents:
exports.handler = async (event) => {
  const path = encodeURIComponent(event.path);

  return {
    statusCode: 302,
    headers: {
      Location: `/login/?redirect=${path}`,
    },
  };
};
And change the second redirect in netlify.toml to look like this:
[[redirects]]
 from = "/pro/*"
 to = "/.netlify/functions/redirect"
 status = 200
 force = true
What's going on here? Unauthenticated visitors will hit our newly created redirect function, but under the URL they were trying to reach. The path parameter in our redirect function will point to, for example, /pro/nested/. We can then escape the path fragment and append it as a query parameter to the /login/ redirect. The visitor will now reach /login/?redirect=%2Fpro%2Fnested%2F.
We should update our login function as well to handle de dynamic redirect. We'll grab the redirect parameter from the URL and set it as the Location for our redirect. I left /pro/ as a fallback in case there's no query string.
// Add this
const { redirect } = querystring.parse(event.headers.referer.split('?')[1]);

// Change this in the try statement
return {
  statusCode: 302,
  headers: {
    'Set-Cookie': `nf_jwt=${access_token}; Path=/; HttpOnly; Secure`,
    'Cache-Control': 'no-cache',
    Location: redirect || '/pro/',
  },
};

// And this in the catch statement
return {
  statusCode: 302,
  headers: {
    'Cache-Control': 'no-cache',
    Location: `/login/?redirect=${encodeURIComponent(redirect)}`,
  },
};
That ought to do it. Here's a demonstration of what we've built. The password is "secret". You can find the full code on Github.
Conclusion
By harnessing the tool belt that Netlify provides with its functions, redirects, and authentication API, we can hide parts of a static website behind a password.