Handling Mollie payments in Grav CMS
Grav is an open source flat-file CMS that I like to work with. It stores all content, settings and data in markdown and yaml files instead of a database. This makes editing and moving the website a breeze, and allows us to put the entirety under version control.
Like most CMS, Grav's functionality can be extended using plugins, which is what we'll learn to do in this article. We'll set up an online payment system for our website using Mollie, a payment processor similar to Stripe that handles most of the payment methods available in The Netherlands and Belgium. In the process, we'll explore some of the more advanced techniques and capabilities that Grav offers and that can be applied irrespective of the functionality we're implementing here. I'm assuming some familiarity with Grav, so we won't cover how to install and use the CMS.
Laying the groundwork
Say we'd want to set up a payment system to accept donations on our website. We'll prepare and configure a new plugin that'll handle the payment flow, and create a /donate page with a simple form that connects to it. First, we need to sign up for a Mollie account.
Signing up for Mollie
Go to https://www.mollie.com/dashboard/signup and create an account. You can roam around and explore your account's dashboard, but for now only two things are important: we need to activate at least one payment method and we need an API key.
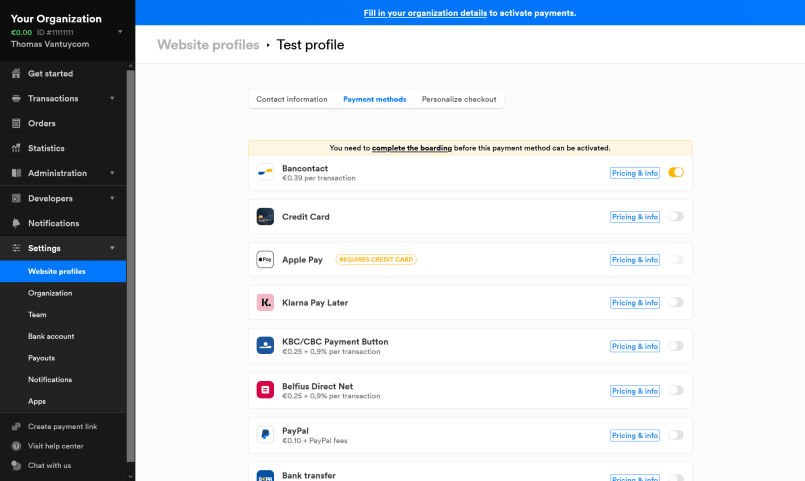
In the left-hand sidebar, navigate to Settings > Website Profiles and then select Payment methods. You'll be presented with a list of methods to switch on or off. Activate the first one, Bancontact, for example; regular debit card payments. If we don't enable at least one method, we won't be able to create payments with the Mollie API.
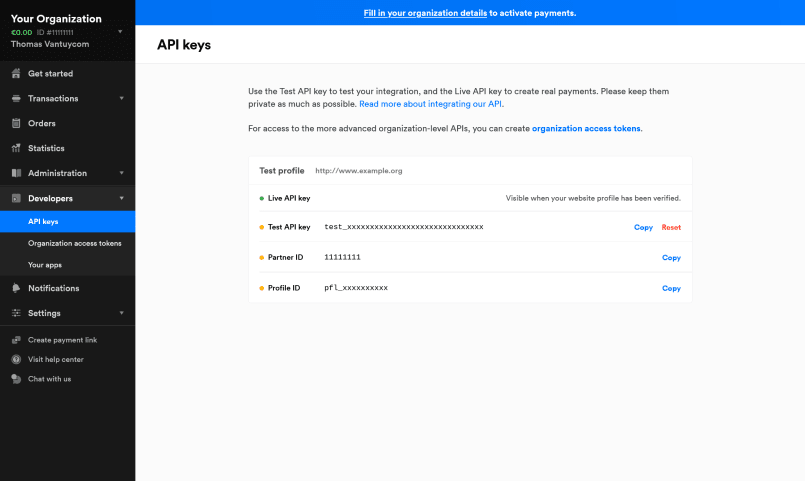
Now go to Developers > API keys. We need an API key to make calls to the Mollie API. Notice how there's a Live and a Test API key. Mollie's test mode allows us to build and debug our application without transferring any real funds. We'll come back to these keys later, when we've set up the scaffolds of our plugin.
Generating a new plugin
The easiest way to get started is using the devtools plugin to scaffold our new project. If you haven't installed it already, run the following command in the root of your Grav site:
bin/gpm install devtools

# or if that doesn't work:
php bin/gpm install devtools
Then we'll set up a blank plugin:
bin/plugin devtools new-pluginYou'll have to provide a name and description for the plugin, among other things. I'm naming mine Mollie. Navigate to the user/plugins/mollie folder and run the following command to complete the setup:
composer updateYou'll find a couple of files in that folder, the most important of which are:
blueprints.yamlandmollie.yaml, defining the configuration options and default settings for the plugin.mollie.php, containing the logic and functionality.
Configuring the plugin
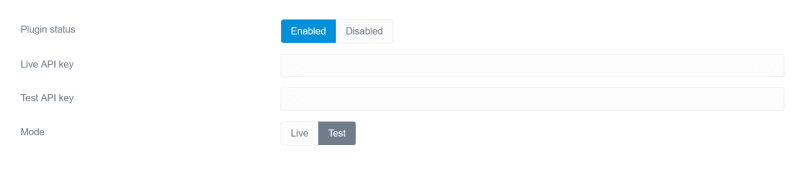
Open up blueprints.yaml. This file contains details about the plugin, like its name and version. Underneath you'll find a form key, defining fields that will appear in the admin dashboard. We'll add some fields to set the API keys for Mollie, and a toggle to switch between live and test mode payments.
Replace the existing form with this one:
form:
  validation: loose
  fields:
    enabled:
      type: toggle
      label: PLUGIN_ADMIN.PLUGIN_STATUS
      highlight: 1
      default: 0
      options:
        1: PLUGIN_ADMIN.ENABLED
        0: PLUGIN_ADMIN.DISABLED
      validate:
        type: bool
    live_api_key:
      type: text
      label: PLUGIN_MOLLIE.LIVE_API_KEY
    test_api_key:
      type: text
      label: PLUGIN_MOLLIE.TEST_API_KEY
    mode:
      type: toggle
      label: PLUGIN_MOLLIE.MODE
      highlight: live
      default: test
      options:
        live: PLUGIN_MOLLIE.LIVE
        test: PLUGIN_MOLLIE.TEST
Notice the uppercase strings like PLUGIN_MOLLIE.LIVE_API_KEY. These are variables that allow for different values in different languages in case we'd want the plugin to be multilingual. We'll only provide the English translations in languages.yaml:
en:
  PLUGIN_MOLLIE:
    LIVE_API_KEY: Live API key
    TEST_API_KEY: Test API key
    MODE: Mode
    LIVE: Live
    TEST: Test
The rest of the configuration takes place in mollie.yaml, where we can set default values for the options we defined. Since we cannot guess the API keys, we'll leave those empty. The plugin's enabled and runs in test mode by default:
enabled: true
live_api_key:
test_api_key:
mode: test
We can now enter Mollie's API keys by copying them in the admin dashboard, or by saving them in a copy of mollie.yaml in the user/config/plugins folder. For now, that's all the configuration we'll need. We'll move on with our last piece of setup: the donation page.
Setting up the payment page
In the user/pages folder, create a new donate folder with a form.md file. In it, we'll define our donation form. Visitors leave their email, optionally their name, and can choose between 3 amounts. The options for the amount are strings with two decimal places, like '25.00', to match the input for Mollie's API that we'll later need. The form has a custom processing action, mollie, that we'll start implementing next. You can visit the /donate page on your website, but submitting the form won't do anything yet.
---
title: Donate

form:
  name: donate
  fields:
    amount:
      type: radio
      label: Amount
      default: '25.00'
      options:
        '25.00': €25
        '50.00': €50
        '100.00': €100
      validate:
        required: true
    name:
      type: text
      label: Name
    email:
      type: email
      label: Email
      validate:
        required: true
  buttons:
    submit:
      type: submit
      value: Donate
  process:
    mollie: true
---

# Donate

Give us all your money.
Mollie's payment flow
With the preparations out the way, we're ready for the real work. If you're not familiar with Mollie, have a look at their payment flow. On our end, it consists of 3 steps:
- We create a payment with Mollie's api and direct the visitor off-site to the checkout page.
- We handle status updates from Mollie with a webhook. That way we'll know when a payment succeeded or failed.
- We thank visitors when they return to our site, or notify them in case something went wrong.
Let's go step by step.
Creating a payment
We'll open mollie.php for the first time. This is where we implement the logic for the plugin. We do this by subscribing to some of the many event hooks Grav provides. Essentially, these are different stages in the rendering cycle of the site where we can jump in and alter the content of a page, or add features to our site.
Have a look at the getSubscribedEvents() function. As the name suggests, this is where we hook into the events of our choice. We'll start with the onFormProcessed event to process the form on the donation page we created earlier. Replace the existing function and add an onFormProcessed function:
public static function getSubscribedEvents()
{
    return [
      'onFormProcessed' => ['onFormProcessed', 0]
    ];
}

public function onFormProcessed($event)
{
    $form = $event['form'];
    $action = $event['action'];

    switch ($action) {
        case 'mollie':
            // Our logic here
    }
}
This will set up a custom form processing action. We'll install Mollie's PHP client and use it here. With the command line in your plugin's folder, run the following command:
composer require mollie/mollie-api-php:^2.0Then we add two use statement at the top of mollie.php.
use Mollie\Api\MollieApiClient;
use Mollie\Api\Exceptions\ApiException;
Now we're ready to use the API client. We'll add functions to retrieve our API key and to create the payment:
public function getApiKey()
{
  $mode = $this->config->get('plugins.mollie.mode');
  $live_api_key = $this->config->get('plugins.mollie.live_api_key');
  $test_api_key = $this->config->get('plugins.mollie.test_api_key');
  return $mode === 'live' ? $live_api_key : $test_api_key;
}

public function createPayment($amount)
{
  $root_url = $this->grav['uri']->rootUrl(true);

  $mollie = new MollieApiClient();
  $mollie->setApiKey($this->getApiKey());

  $payment = $mollie->payments->create([
    "amount" => [
      "currency" => "EUR",
      "value" => $amount
    ],
    'description' => "Donation to www.example.com",
    "webhookUrl" => $root_url . '/mollie/webhook',
    "redirectUrl" => $root_url . '/mollie/return'
  ]);
  return $payment;
}
The webhook and redirect URLs don't exist yet, we'll handle those later. But we can already redirect the user to Mollie's hosted checkout page, issuing a status 303 as suggested by the documentation. Going back to the onFormProcessed function, we now get:
public function onFormProcessed($event)
{
  $form = $event['form'];
  $action = $event['action'];

  switch ($action) {
    case 'mollie':
      try {
        $amount = $form->value('amount');
        $payment = $this->createPayment($amount);
        $this->grav->redirect($payment->getCheckoutUrl(), 303);
      } catch (ApiException $e) {
        $this->grav['messages']->add('Something went wrong on our end. Please try again.', 'error');
        $this->grav['log']->error('plugin.mollie: ' . $e->getMessage());
      }
  }
}
We retrieve the amount from the submitted form, create a payment with that value, and redirect the visitor. We handle any errors that might occur by showing a general message to the user and logging the detailed error message for internal use. The logs can be found in /logs/grav.txt. Notice how the error message for the user is hard-coded in English. We could make use of the languages.yaml file and add our error message there:
# languages.yaml
en:
ERROR_MESSAGE: Something went wrong on our end. Please try again.// mollie.php
$error_message = $this->grav['language']->translate('PLUGIN_MOLLIE.ERROR_MESSAGE');
$this->grav['messages']->add($error_message, 'error');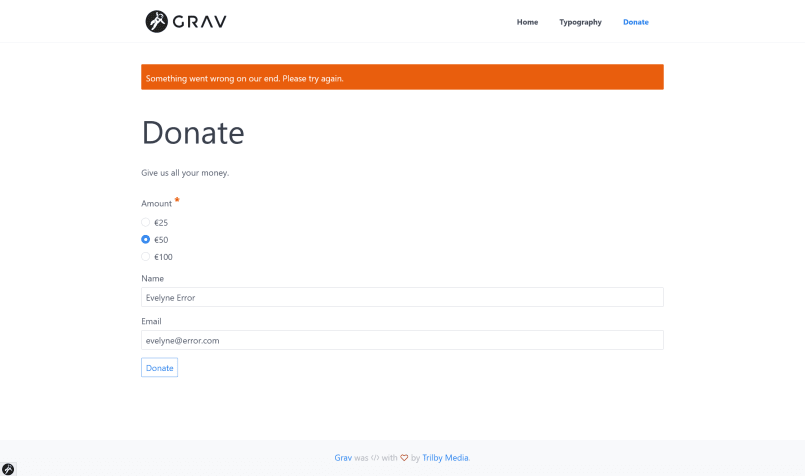
Depending on your development setup, form submittal on the /donate page will trigger an error. Mollie checks if the webhook URL is accessible and errors if it's not. That means localhost URLs won't work. I resort to ngrok to have Mollie reach the webhook. Comment out or remove the webhookUrl key in the $mollie->payments->create call if you want to test if the first stage works on localhost, anyway.
Looking closer at the redirect URL, you might notice another problem. After completing the payment, Mollie redirects the visitor to the /mollie/return path on our website. Here we'll handle payment failure or success and show appropriate messages to the users. But how do we know which payment they return from? Each payment has an ID, but we're only able to retrieve that ID after the API call's been made. In other words: we can't add the ID to the return URL upon payment creation. We could come up with an identifier of our own, say a donation ID, but then we somehow need to link the donation ID to Mollie's payment ID. We'll have to store some information in Grav. There's no database at our disposal, but we can make use of Grav's relatively new Flex Objects. Time for a brief detour.
Storing data with Flex Objects
Flex Objects were introduced with Grav 1.7.0. and provide support for custom data types that can easily be stored and manipulated. Grav's pages and accounts are now different Flex types for example, and we can add our own. We define these data types in a yaml blueprint.
First, make sure to install the flex-objects plugin if you haven't yet. In the root of your Grav installation, run:
bin/gpm install flex-objectsBack in the plugin, create a donations.yaml file in a /blueprints/flex-objects folder. Here's how it will look:
title: Donations
description: Donations directory
type: flex-objects

form:
  validation: loose
  fields:
    payment_id:
      type: text
      label: Payment ID
    date:
      type: datetime
      label: Date
    amount:
      type: radio
      label: Amount
      default: '25.00'
      options:
        '25.00': €25
        '50.00': €50
        '100.00': €100
    status:
      type: text
      label: status
    name:
      type: text
      label: Name
    email:
      type: email
      label: Email

config:
  data:
    storage:
      class: Grav\Framework\Flex\Storage\FileStorage
      options:
        folder: user-data://donations/
  admin:
    views:
      list:
        fields:
          payment_id:
            link: edit
          date:
          amount:
          status:
          name:
          email:
        options:
          per_page: 15
          order:
            by: date
            dir: desc
    menu:
      list:
        hidden: false
        route: '/donations'
        icon: fa-gift
        authorize: [admin.super']
There's a lot going on here, but I'll explain. This is a pick from the array of configuration options.
The form defines the fields or the keys that our custom objects can contain. We'll store Mollie's payment_id, the date of the donation, the amount, the status of the payment, and the donator's name and email if those were given.
The config.data key determines where and how Grav will store the data. The class determines if objects are stored in a single file (Simple Storage) or in separate files (File Storage). Based on this issue in the flex-objects plugin, I opted for FileStorage. That prevents information from getting lost or overridden. The folder sets in which sub-folder of user/data the objects will be stored.
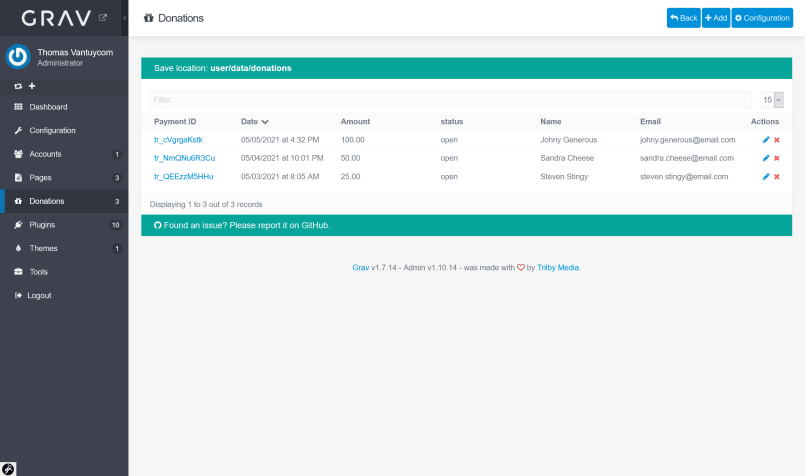
The config.admin key defines the appearance in the admin panel of our site. The menu part creates a section in the sidebar with an icon, so that admin users with the right privileges can look at a list of the data. The views.list key determines which fields will be shown in the admin panel. Here, we show all the fields, and we order the objects by descending date. Our Flex directory might look like this in the admin panel eventually:
To activate our donations data type, we first have to register the blueprint we've created. There's no onRegisterFlex hook, but there's the slightly more convoluted FlexRegisterEvent class. Add the following to mollie.php:
use Grav\Events\FlexRegisterEvent;

public static function getSubscribedEvents()
{
  return [
    FlexRegisterEvent::class => ['onRegisterFlex', 0],
    'onFormProcessed' => ['onFormProcessed', 0],
  ];
}

public function onRegisterFlex($event)
{
  $flex = $event->flex;
  $directory = $flex->getDirectory('donations');
  if (!$directory || !$directory->isEnabled()) {
    $flex->addDirectoryType('donations', 'plugins://mollie/blueprints/flex-objects/donations.yaml');
  }
}
Check in the admin panel if the Donations section appears in the sidebar. If so, Grav successfully picks up our new data type. Let's put it to use. Here's what we'll do:
- We create a donation object with partial and preliminary data. We omit the
payment_idand set thestatustoinitializing. Grav generates a storage key that'll serve asdonation_id. - We change the
returnUrlto include thisdonation_id. Mollie's metadata feature will link the payment to the donation on their side. - After the API call, we update the donation object with the missing
payment_idand mark thestatusasopen. We save the data again.
In mollie.php, add the following function:
public function createDonation($form)
{
    $date = date('c');
    $status = 'initializing';
    $amount = $form->value('amount');
    $name = $form->value('name');
    $email = $form->value('email');

    $flex = $this->grav['flex'];
    $directory = $flex->getDirectory('donations');
    $object = $directory->createObject([
        'date' => $date,
        'amount' => $amount,
        'status' => $status,
        'name' => $name,
        'email' => $email
    ]);
    $object->save();

    return $object;
}
Pass an additional parameter to createPayment and use it:
public function createPayment($amount, $donation_id)
{
    // ... what we had earlier

    $payment = $mollie->payments->create([
        // ...
        'metadata' => [
            'donation_id' => $donation_id
        ],
        'redirectUrl' => $root_url . '/mollie/return?id=' . $donation_id
    ]);

    return $payment;
}
Now connect the pieces by changing the try { } statement in onFormProcessed:
try {
    $donation = $this->createDonation($form);
    $donation_id = $donation->getStorageKey();
    $amount = $form->value('amount');

    $payment = $this->createPayment($amount, $donation_id);
    $donation->update([
        'payment_id' => $payment->id,
        'status' => $payment->status
    ])->save();

    $this->grav->redirect($payment->getCheckoutUrl(), 303);
}
That completes the first payment step. Submitting the form should redirect you to Mollie's checkout page and leave a new entry in the Donations admin dashboard. We'll move on with the webhook functionality.
Listening for status updates with a webhook
The visitor is off to complete the payment on a hosted checkout page. Mollie will notify us of payment success, failure, or any other status changes through our webhook. Mollie sends a POST request with a single parameter, id, which is the id of the payment that changed status. To get the actual status, we have to call the API again. If Mollie notified us of the new status immediately, malicious users could mark any payment as complete with a simple POST request to our webhook. We'll respond to the webhook request by issuing a 200 OK status, otherwise Mollie keeps calling the webhook every so often.
Create a handleWebhook function. In it, we retrieve the relevant payment from Mollie, look up the associated donation using the donation_id metadata, and save the new status. If the payment was successful, we send an email with a confirmation.
public function handleWebhook()
{
  $payment_id = $_POST['id'];

  $mollie = new MollieApiClient();
  $mollie->setApiKey($this->getApiKey());

  $payment = $mollie->payments->get($payment_id);
  $donation_id = $payment->metadata->donation_id;
  $status = $payment->status;

  $donation = $this->grav['flex']->getObject($donation_id, 'donations');
  $donation->update(['status' => $status])->save();

  if ($status === 'paid') {
    $email = $donation->getProperty('email');
    $this->sendEmail($email);
  }

  http_response_code(200);
  exit;
}

public function sendEmail($email)
{
  $to = $email;
  $from = 'email@example.com';

  $subject = 'Payment confirmation';
  $content = 'Thank you for your donation!';

  $message = $this->grav['Email']->message($subject, $content, 'text/html')
    ->setFrom($from)
    ->setTo($to);

  $this->grav['Email']->send($message);
}
For the sendEmail function to work, you need to install and configure the email plugin.
Now how does Grav know that this should be the response to the /mollie/webhook route? In our plugin, we'll check if the current route corresponds to this webhook route, and call the handleWebhook function if so. The earliest event hook where Grav's uri object has been initialized is onPluginsInitialized, so we'll use that one.
public static function getSubscribedEvents(): array
{
return [
FlexRegisterEvent::class => ['onRegisterFlex', 0],
'onFormProcessed' => ['onFormProcessed', 0],
'onPluginsInitialized' => ['onPluginsInitialized', 0]
];
}
public function onPluginsInitialized()
{
$route = $this->grav['uri']->route();
if ($route === '/mollie/webhook' && $_SERVER['REQUEST_METHOD'] === 'POST') {
$this->handleWebhook();
}
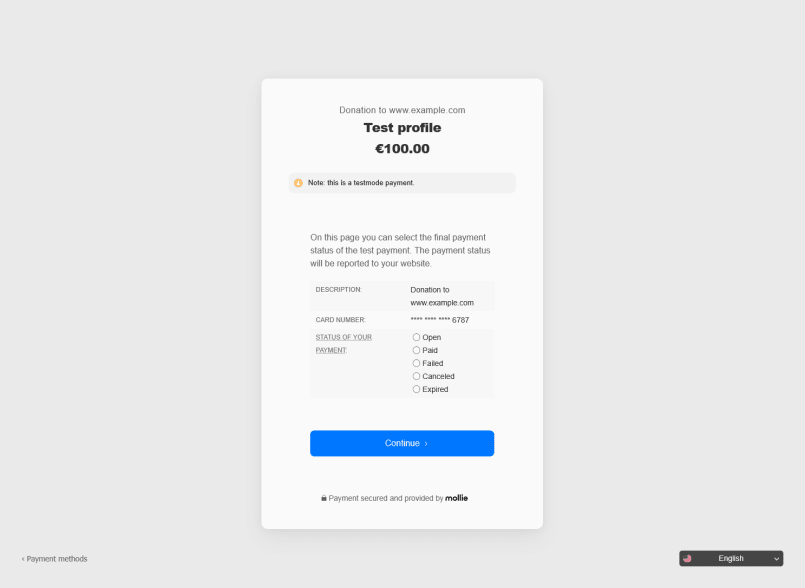
}The webhook is now fully functional. To test this, visit the donation page and submit the form. On the checkout page, you'll be offered the choice to set the payment to a status of your liking. Let's mark the payment as paid and press Continue. This should update the flex donation object, which you can check in the admin dashboard or directly in the user/data/donations folder. If you're using ngrok, you should see the 200 OK response in the terminal.
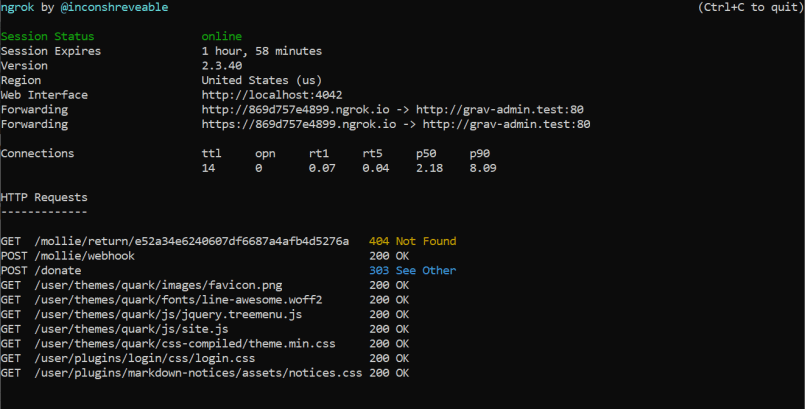
200 OK response to the webhook, but a 404 for the unhandled return route.All that's left is to welcome the visitor back to our website. On to the last step.
Informing the user of success or failure
After completing the payment, Mollie will send the visitor back to the route that we configured. It'll look something like mollie/return?id=da6e91d35200331bab9100a70874832c, where the long id parameter refers to a donation_id.
We add another route to look out for in onPluginsInitialized:
public function onPluginsInitialized()
{
// ... what we had earlier
if ($route === '/mollie/return') {
$this->handleReturn();
}
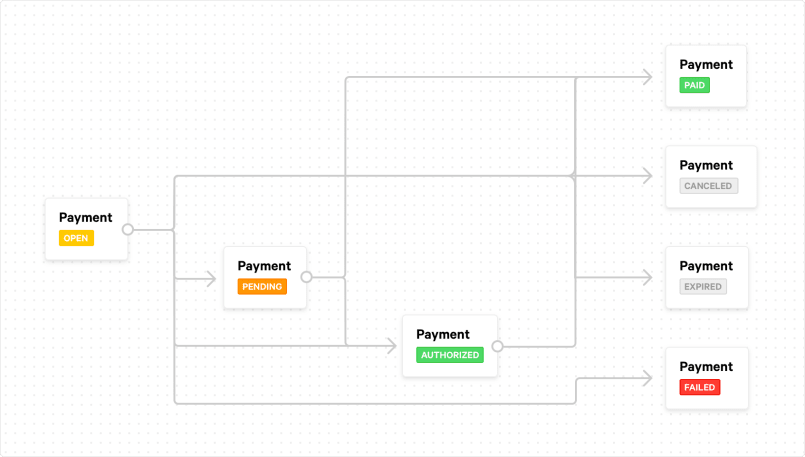
}Then we set up the handleReturn function. It picks up the id query parameter, looks up the status on the corresponding donation, and acts accordingly. A Mollie payment can be in many states, but ultimately it comes down to three cases:
- The payment is
paid: success! - The payment
failed,expiredorcancelled: failure! - The payment is in another state and we have to await further status changes: pending.
On success, we'll redirect the visitor to a Thank you page. On failure, or in case of a pending payment, we redirect the user back to the donation form, and show appropriate error or information messages.
public function handleReturn()
{
  try {
    $donation_id = $this->grav['uri']->query('id');
    $donation = $this->grav['flex']->getObject($donation_id, 'donations');
    $status = $donation->getProperty('status');

    switch ($status) {
      case 'paid':
        $this->grav->redirect('/thank-you');
        break;
      case 'failed':
        $this->grav['messages']->add('Your payment failed. Please try again.', 'error');
        $this->grav->redirect('/donate');
        break;
      case 'expired':
        $this->grav['messages']->add('Your payment expired. Please try again.', 'error');
        $this->grav->redirect('/donate');
        break;
      case 'canceled':
        $this->grav['messages']->add('Your payment got canceled. Please try again.', 'error');
        $this->grav->redirect('/donate');
        break;
      default:
        $this->grav['messages']->add('Your payment is pending. We will send an email when the payment succeeded', 'info');
        $this->grav->redirect('/donate');
    }
  } catch (\Error $e) {
  } catch (\Exception $e) {
  }
}
We catch any errors or exceptions so that an unknown donation_id in the URL will cause a 404 error.
All that's left is setting up the Thank you page. Create a page with the default template, or a custom template of your liking. In its simplest form, it might look like this:
---
title: Thank you
metadata:
  robots: 'noindex, nofollow'
visible: false
---

# Thank you

Thank you for your donation!
The robots metadata will prevent search engines from indexing the page. The visible: false statement excludes the page from your site's menu.
Conclusion
That was a lot. There's still room to improve our plugin in terms of error management or security, but all in all we established a solid base. We learned how to store data in Grav using Flex Objects, how to handle API-like routes, and how to extend Grav's functionality using some of its many event hooks. If you want to play around more with plugins, make sure to check out the plugin directory. Most plugins are open source, and browsing through the code can teach you some new tricks. There's also Grav's documentation, which we already referred to a number of times. Happy coding.